The process to backup PS4 data to the cloud is simple. You only need a PlayStation Plus subscription to access PlayStation’s cloud storage options. You can get a single month for as little as $10 per month, but the more cost-effective option is to invest for a year at a time, or roughly $60 per year.
How To Backup PS4 Data To The Cloud
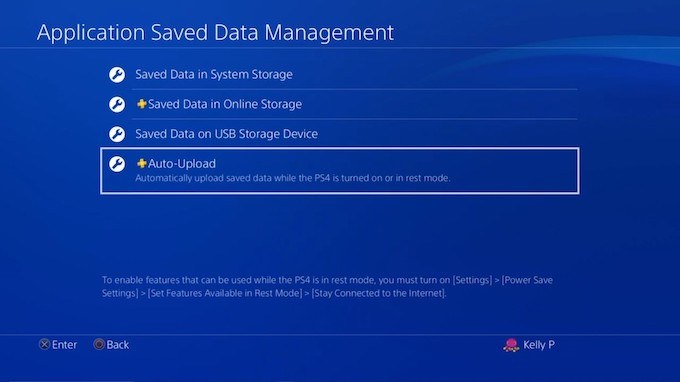
The most obvious (and common) use for PS4 cloud storage is to ensure your saved games are not lost if your console is damaged. Another great reason is to transfer save data from one console to another; for example, to show off something in a game to a friend. No matter the reason, here’s how to get started. Go to the PlayStation 4 main menu by pressing the PlayStation button on your controller. From there, make your way to the Settings menu—the toolbox icon at the far-right beside the power icon. From here, scroll down the menu until you find Application Saved Data Management. You will then see four different menu options:
Saved Data in System StorageSaved Data in Online StorageSaved Data on USB Storage DeviceAuto-Upload
Select Auto-Upload. It will take you to the next screen where you can then choose what, if any, games and applications you want to automatically upload to the cloud. You will first need to make sure the box is checked beside Enabled Automatic Uploads. Any game you choose will automatically upload its data to the cloud whenever the PlayStation 4 enters Rest Mode, provided you have Stay Connected to the Internet selected in power settings. Of course, this isn’t the only method for uploading save data to the cloud.
How To Upload Save Data To The Cloud From The Main Menu
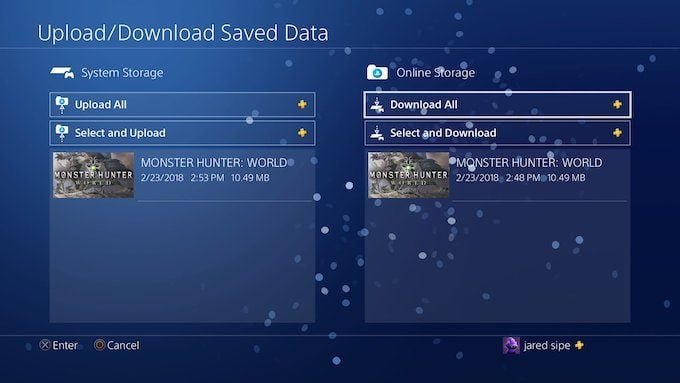
If you don’t want to enable automatic uploads (perhaps because you have limited bandwidth) but you want to backup data to the cloud for a one-time event, there’s an easy way. First, select the game in the main menu that you want to upload. When you find it, press the Options button on your controller. A menu will pop in from the right side of the screen. The first option is to Upload/Download Saved Data. Press X. You will be taken to a new screen where you will see all of the data currently in online storage. You can also see all of the available data stored on your system. At the top, you have two options: Upload All, which takes all of your saved games on your system memory and uploads to the cloud, or Select and Upload which allows you to choose individual saved files to upload. The second setting is the best one to choose if you have multiple saved files and only want to back up the most recent. However, if you don’t use cloud storage often and you want the quick and easy version, just choose Upload All. If you choose to automatically upload your data to the cloud, it may take several hours before it’s all available, depending on the speed of your Internet connection. Keep in mind that first-generation PlayStation 4s are notorious for poor Wi-Fi cards, so if you want to upload your information quickly, use an Ethernet cable.
Backing Up PS4 Data Without a PlayStation Plus Subscription
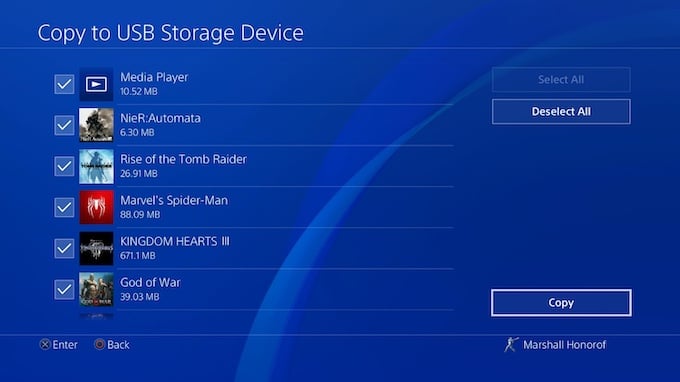
While PS+ is a great value with the number of free games and cloud storage it provides, many people don’t care about the games and find that paying $60 per year (or more) is a lot of money just for cloud storage. If you only have a few specific saved files you want to protect, you can do so for free. Just use a USB card instead of cloud storage. Go to the Settings menu and choose Application Saved Data Management again. Instead of choosing Auto-Upload, select Saved Data in System Storage and then choose Copy to USB Storage Device. Once you choose the USB medium you want to save the data to, you just have to sit back and wait—and remember to keep the drive in a safe place! No matter your reason for backing up your data, it’s a good idea to know how. Nothing is more devastating than losing your favorite save file and being forced to start all over again from scratch.


