No matter if it’s an internal webcam or an external one, both may not work due to various reasons like outdated drivers or BIOS, denied access, or even hardware faults. And Dell users have been widely experiencing this issue recently. So, in this article, we will discuss the potential fixes to resolve webcam issues on Dell PCs.
How to Fix Webcam Issues on Dell?
Some applications may cause technical bugs and errors in handling the camera module. Confirm a quick check by opening the camera with any other application. If the camera works fine with other applications, reinstall the app that’s causing the problem. Or you can try to search for specific fixes for that application online. But if it’s not the problem of a specific app, try the fixes listed below:
Check For Webcam Defects
Insert an external webcam, if possible, and check whether your webcam is working or not. If the other webcam works well on your PC, it might be your internal webcam’s hardware problem. You can visit the nearest Dell service center for support. Secure the connection ports and cables if it’s already an external webcam. If you have another spare webcam, you can try connecting it to your PC to check whether the problem is in the camera or computer. Or you can try to connect your problematic webcam to any other computer to narrow it down as a hardware problem. You will have to change the external webcam if your webcam doesn’t work with any other PC.
Permit Access
Applications need the permission of the user to access the camera. They may ask permission while using, but you may have condemned and suppressed the request prompt. In this scenario, you can go to the settings can give the camera access to whichever application you want. Follow the steps below to proceed:
Update Driver
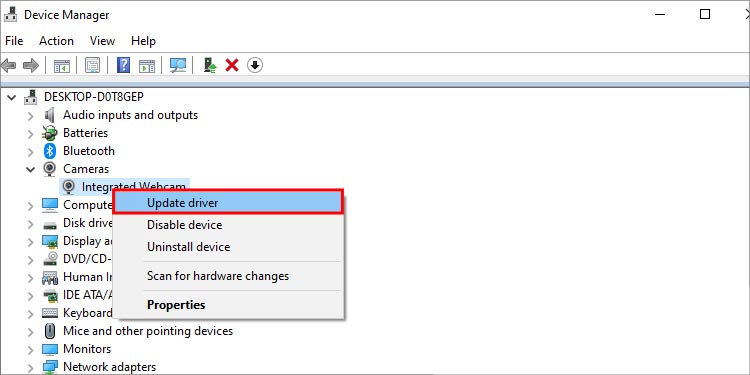
Updating drivers is an automatic and ongoing process of Windows. But, sometimes, Windows might not automatically install the drivers. In such a case, you can manually initiate the process of updating drivers from Device Management. Follow the steps mentioned below to update webcam driver: Windows will automatically install the correct updates for your webcam.
Reinstall Drivers
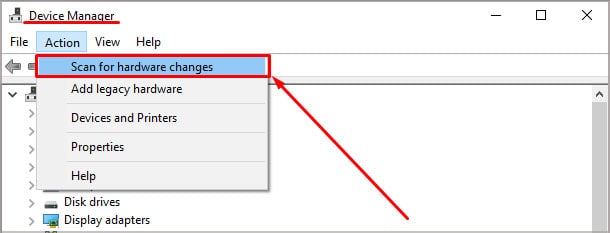
Updating the driver would fix compatibility issues for the camera. But if the existing driver itself is corrupted, updating won’t help. You will have to reinstall your driver to eliminate the corrupted parts. Here’re the steps: Upon restart, Windows will automatically install the drivers required for your camera device. If it doesn’t, then you can manually initiate the process. Open Device Manager and click on Action > Scan for hardware changes. Wait till Windows detects and install the new webcam driver. Once done, check if it solves the issue.
Troubleshoot Camera
Dell provides its users with a dedicated app for various troubleshooting purposes called SupportAssist. It is an automated app, but you can manually proceed to detect and solve camera issues as well. Most Windows 10/11 dell users would have it pre-installed. But in case you haven’t, you can always download it. Install with the on-screen instructions and follow the steps below to troubleshoot the webcam:
Disable Antivirus Temporarily
Various Antivirus software may confuse legitimate apps with threatening ones and may not let applications access any of the PC devices. Thus, you can try to disable the running third-party antivirus software and inspect if it solves the issue. Steps for disabling various software may vary. So, you can search the procedures for your brand of Antivirus online.
Ensure Camera from BIOS
The hardware attached to the computer needs to communicate with the motherboard constantly. At the basic level, BIOS works as that communication channel. BIOS also has got the privilege to provide or cut off the camera’s access to the OS. If the camera is disabled from BIOS, it can’t be accessed from the software level. So, proceed with the following steps to ensure that the camera is enabled from BIOS:
Update BIOS
Outdated BIOS can also cause problems to the various peripheral devices attached to a computer, including a webcam. Thus, we’ll continue updating your motherboard’s BIOS in this section. Let’s proceed to update the BIOS from the Dell SupportAssist. Open the app, and follow the steps below: You may need to turn off Bitlocker before updating. Or you can update bios directly from Dell’s website. For this, you first need to find the Model number of your PC. Then, go to Dell’s website, enter your model number on the search bar, and hit the Search button. Once done, boot your computer and check whether the issue is resolved or not.


